Check us out on social media!

Showing posts with label recipes. Show all posts

An easy Lemon Cheesecake


There are sometimes I crave cheesecake. My friend, who is training me for the 5K, often tells me that "Cheesecake isn't healthy. Too much fat. Too much sugar. Too much blah blah blah blah.". Seriously, never come between a girl and her cheesecake.

So the other day, I was on Facebook when I came across cheesecake bars. I hadn't had any sweets like chocolate or cake in so long, I was hoping someone had invented "instant food" where you click "Order" on a recipe and it magically shows up in your lap.

So I decided I would make cheesecake... It would be my very first cheesecake! But everyone makes cherry cheesecake. I've had it so many times, I wanted something with a little more zing and brightness, considering it's starting to feel a lot like Spring and early Summer here in Texas. I thought "How about lemons?".

So I went to Walmart, where I bought everything (including an itty-bitty grater that only cost me 98 cents). Well, almost everything. I had gotten home only to realized I had forgotten the most important part - lemons! But I had to wait a while to go back, which concluded with me driving home with 4 tiny lemons in the pouring rain.

So, you ready for a dessert that's not exactly diet-approved but is bright and yummy?


Lemon Cheesecake (with Blueberry & chocolate topping)

Ingredients
  • 1 9oz pre-baked graham cracker pie crust
  • 16oz cream cheese (I used Philadelphia.)
  • 1 egg
  • 1/4 cup fresh lemon juice
  • 1 tspn lemon zest
  • 1 tbsp flour
  • 2 tbsp blueberry pie/topping
  • 1 handful Hershey milk chocolate chips
  • 1/4 cup milk
Cooking Directions
  1. Preheat over to 350*.
  2. Beat cream cheese until creamy.
  3. Add flour, egg, sugar, lemon juice, and lemon zest. Mix until kind of thick, kind of like a custard.
  4. Pour into pie crust.
  5. Bake for 30 minutes or until middle is no longer jiggly.
  6. Set out to bring to room temperature. 

To make the topping:
  1. Place milk chocolate chips in a microwave-safe bowl with 1/4 cup of milk. Microwave on high for 1 minute.
  2. Remove bowl and stir until the chocolate becomes smooth. Drizzle or speckle across the top of the cheesecake.
  3. Place cheesecake in the fridge for 3 hours before serving, though overnight is better.
  4. Before serving, you can heat up the blueberry pie filling/topping or use it at room temperature.
  5. Spoon topping into the middle of the the cheesecake.
Considering it was my first cheesecake, it came out GREAT! 

What is your favorite kind of cheesecake?
read more "An easy Lemon Cheesecake"

Feed your hunger with #FarmersPantry (Recipe)

I was NOT compensated for this post. I received FREE Farmer's Pantry products to review. All thoughts/opinions are my own. Your experience may differ.


If you're from the south, you love cornbread. You pretty much eat it for breakfast, lunch, and dinner. But there are times you don't feel like making it but you know you crave the taste!

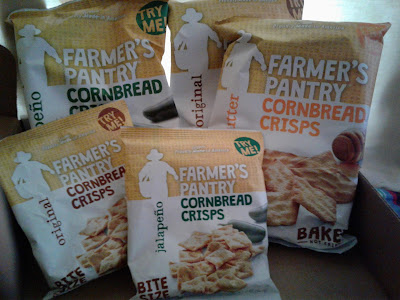
Farmer’s Pantry, the proudly American new snack brand, debuts the first in its line of exciting new snacks: Farmer’s Pantry Cornbread Crisps. They have created hearty, crunchy snacks made with wholesome ingredients you can identify, grown exclusively on American farms.

Farmer's Pantry Cornbread Crisps come in 3 flavors - Jalapeno, Original, and Honey Butter. Bite size bags are also available in Original and Jalapeno!

RECIPE
Looking to put Farmer's Pantry Cornbread Crisps to use this holiday season?

Farmer’s Pantry Cornbread Crisp Recipe 
Courtesy of Esther Lilli, from an Italian family recipe circa 1880

INGREDIENTS
2 cups Farmer’s Pantry Cornbread Crisps, crushed
3 cloves of garlic, diced
1 small onion, diced small
2 stalks of celery, diced small
2 pounds of Italian Sausage – casings removed
½ cup grated Parmesan Cheese
1 small potato, mashed
1 cup chicken broth or chicken stock

DIRECTIONS
Cook Italian Sausage until done, but do not crisp. As it cooks, use a wooden spoon to create small pieces. Remove from pan and set aside.
Saute garlic, onion and celery in olive oil until golden brown (about 8-10 minutes on medium heat).
Remove from pan.
Add all ingredients and mix in a large bowl.
Grease a baking pan, and cook at 350 degrees for 40 minutes.
Serve hot, or cover and heat the next day.

This is great for Thanksgiving!

Be sure to follow Farmer's Pantry on Facebook and Twitter!

BUY
You can purchase Farmer's Pantry Cornbread Crisps on their website or use their store locator.

WHAT I THOUGHT
This Texas girl loves her cornbread! But I don't want to always have to make it every time I want some. Farmer's Pantry Cornbread Crisps are a great little "cornbread" snack! Seriously, they are delicious! My favorite by far is the Honey Butter. It tastes like sweet crunchy cornbread. I had to stop myself from devouring the entire bag.


My sister's favorite was the Jalapeno. I love spicy and apparently, so does she. The Jalapeno bite size goes GREAT with bland tuna! It adds a spiciness and tang to it. It may not look appetizing, but it was yummy!


Like I said, it doesn't look appetizing at all, but it was so good! 
read more "Feed your hunger with #FarmersPantry (Recipe)"

#Jarlsberg Swiss Cheese Crescent Rolls {Recipe}


It's almost Easter Sunday, and families all over will be having rolls or biscuits with their Easter dinner. Don't get me wrong - rolls with any dinner are delicious. But sometimes I want something with a little more... zing to it.

As a lover of Jarlsberg Cheese, I knew I wanted to use some for Easter. I decided that I wanted to incorporate my favorite of crescent rolls and Jarlsberg cheese.

(Be sure to follow Jarlsberg on Facebook and Twitter!)

Use their store locator to find a retailer near you.


Jarlsberg Swiss Cheese Crescent Rolls
Ingredients


  • 1 canister of crescent rolls
  • Jarlsberg Swiss Cheese Lite slices (If you can't find it at your local cheese store, wedge will work too.)

Directions
  • Cut Jarlsberg Swiss Cheese Lite slices in half and set aside.
  • Pop open crescent roll canister and divide dough like you normally would.
  • Fold sliced cheese halves into fourths. 
  • If you can only find the wedges, cut it up into quarter to half-dollar sized pieces.
  • Stuff cheese into dough and roll into crescent shape. (If you can't, blobs work just as well. It'll still taste good!)
  • Bake at 350* for 12-15 minutes until golden brown and cheese is melted and delicious.

These would also make dynamite appetizers!

What's your favorite Easter dish?


read more "#Jarlsberg Swiss Cheese Crescent Rolls {Recipe}"

5 Delicious Recipes to try on Valentine's Day!


It's almost Valentine's Day, and for those who love to give sweets or just like to make them for themselves, I found some absolutely drool-worthy recipes! I might have to try the Valentine's Day Chocolate Chip cookies. Who doesn't love a chocolate chip cookie?

If you see a (K), know that it's also a kid-friendly recipe that little ones can help with!
Valentine's Day Chocolate Chip Cookies
(Credit Source)


Oreo Truffles Valentine's Hearts
(Credit Source)
2. Oreo Truffles Valentine's Hearts from Oh My God Chocolate Desserts


Cake Heart Pops
(Credit Source)
3. Valentine's Day Vanilla Cake Heart Pops from Celeb Baby Laundry (K)


Cherry Heart Pies
(Credit Source)
4. Valentine's Day Cherry Heart Pies from Frugal Coupon Living


Raspberry Rolls
(Credit Source)
5. Heart Shaped Raspberry Rolls from Imperial Sugar


Have fun, and if you try any of these, let me know how they turn out!
read more "5 Delicious Recipes to try on Valentine's Day!"

Easy Garlic Herb Microwave Mashed Potatoes

Mashed potatoes. It's a stable in most households. But who has time to wait for the slow cooker to do its magic, and during the weekends, no one wants to really wait for potatoes to boil on the stove. Did you know that in about an hour, you can have yummy mashed potatoes from the microwave? It's true! We needed mashed potatoes to go with our meal Saturday, but we didn't have a lot of time to wait for the slow cooker or potatoes to boil, so we decided to use the microwave. It was surprisingly easy!

Easy Garlic Herb Microwave Mashed Potatoes

Easy Garlic Herb Microwave Mashed Potatoes

Prep time: 10-15 minutes
Cook time: 20-40 minutes
Yield: 6-8 servings
Ingredients
  • 4 large potatoes (We used 2 Idaho and 2 Yukon Gold. It was all we had on hand.)
  • 2 teaspoons garlic powder (You can use more or less, depending on your taste.)
  • 1 1/2 tablespoons Italian herb seasoning (We used Spike! 5 Herb Magic.)
  • 1 cup milk
  • 1 tablespoon butter
  • Salt and pepper to taste.
Cooking Directions
  1. Peel and cut the potatoes into cubes.
  2. Put potatoes in a large microwaveable bowl. Fill bowl with water until potatoes are submerged.
  3. Microwave on high for 20-40 minutes. (Microwave times may very. Check for softness after 20 minutes. You may need to extend or decrease cooking time.)
  4. Drain most of the water. Pour in 1 cup of milk.
  5. Mash until desired consistency. (I like mine lumpy!)
  6. While potatoes are still hot, put in 1 tablespoon of butter and stir.
  7. Add 2 teaspoons of garlic powder and 2 tablespoons of Italian Herb seasoning, and stir.
  8. Add salt and pepper to taste.

They were such a hit with the family, I've had several people ask for the recipe! I mean, who doesn't love mashed potatoes?


read more "Easy Garlic Herb Microwave Mashed Potatoes"

Get a FREE “Fire Up the Grill” cookbook from #Kraft!


Sponsored post by Lunchbox.


Summer is in full swing, so let Kraft help you plan the perfect celebration with the “Fire Up the Grill” cookbook! In this cookbook, you’ll find delicious recipes and tips for your picnics, cook-offs, parties and more to make this summer the most memorable one yet! Click the image to download the free Kraft “Fire Up the Grill” cookbook and find more amazing recipes!

Sample recipe:


Coconut Sopapilla Cheesecake

Prep time: 15 min.
Cook time: 25-30 min.
Total time: 45 min.
Yield: 16 servings

Ingredients
  • 1 pkg (8 oz each) refrigerated crescent rolls
  • 2 1/2 pkg (8 oz each) PHILADELPHIA Cream Cheese, softened
  • 2 cups powdered sugar
  • 1 tsp vanilla
  • 1 cup Baker's Angel Flake Coconut
  • 1/4 cup toasted Baker's Angel Flake Coconut
  • 1 stick butter, melted
  • 1/2 cup sugar
Cooking Directions
  1. Preheat oven to 325*F. Spray a 9x13 baking dish with cooking spray. Unroll one package of crescent rolls and lay them flat on the bottom of the pan.
  2. Mix the cream cheese, powdered sugar, coconut, and vanilla with a mixer until smooth. Spread mixture over the bottom layer of crescent rolls.
  3. Layer the second package of crescent rolls over the cream cheese mixture. Melt the stick of butter and pour it over the top layer of rolls. Sprinkle sugar evenly over the top. Sprinkle cinnamon to taste.
  4. Bake at 325*F for 25-30 minutes. Remove from oven and top with remaining toasted coconut.
I've downloaded the Fire Up the Grill cookbook and all the recipes look amazing! I can't wait to try the Cheesy Hot Dog Crescents. Yum!
read more "Get a FREE “Fire Up the Grill” cookbook from #Kraft!"

5 Patriotic Snacks to try on July 4th!


July 4th is known for good barbecue, patriotism, and fun in the sun. But what about when the food is all gone, and just before the fireworks start, you feel your tummy grumble? Yep, it's time for a snack!

I found 5 snacks that are sure to hand-in-hand with the red, white, and blue! (Kids may fall in love with them, too.)

1. Patriotic Popcorn from Crazy Little Projects
This popcorn snack has 2 of my favorite snackables - marshmallows and M&Ms.


2. Red, White, & Krispy Treats from Random Thoughts of a Supermom
These Rice Krispy treats are colorful, and who doesn't love a good Rice Krispy treat? I know I do!


3. Patriotic Brownies from Betty Crocker
Brownies? Red, white, and blue M&Ms? What's not to like? (I am seriously thinking of making these!)

4. 4th of July Jello Partfaits from Hoosier Homemade
It just seems fitting to have Jello on July 4th. These definitely make Jello seem more exciting!


5. Rocket Dogs from Rada Cutlery
Not everyone likes to have something sweet as a snack. Sometimes they want a savory snack. Not only are these easy to make, they are super festive!

Which ones do you want to try? I want to try them all!
read more "5 Patriotic Snacks to try on July 4th!"

Try #Finlandia Butter in these recipes!


It's unofficially summer, and that means people are firing up their grills. We have 2 delicious recipes you can try using Finlandia Butter! This eclectic natural butter is perfect for breakfast, to butter a favorite muffin or croissant with its sweet, rich taste. Finlandia® Imported Butter is also a go-to choice for recipes and at dinnertime or to create delicious baked goods and decadent chocolate delights. Just in time for summer, Finlandia® Imported Butter offers that perfect final touch for your BBQ, for seafood or vegetables. To find a retailer near you, click here.

Grilled Corn on the Cob with Finlandia® Imported Butter Sauce
Ingredients
1 stick of Finlandia® Imported Butter, softened
3 cloves of Garlic, smashed
Salt and pepper to taste
Pinch of sugar
1 teaspoon of paprika
Lime
Fresh Corn on the cob (in husks)
Optional: If you like a bit of spice, add in a teaspoon of Cumin

Directions
Mix all ingredients together and melt in a small pot.
Grill your corn (in the husk) for about 15 – 20 minutes, being sure to turn often. Once it is done, let it cool a bit before you remove the husks, wearing grill gloves to protect your hands. Then, using a brush, apply the butter sauce. Serve the rest in a bowl.

Grilled Lobster with Finlandia® Imported Butter Sauce

Ingredients
2 tablespoons of Finlandia® Imported Butter, melted
Lemon
Salt and pepper to taste
1 Tablespoon of Paprika
Lobster Tails (thawed)

Directions
Before you light grill, use olive oil spray on grill.
Heat grill to high temperature.
Mix all ingredients for marinade, and split lobster tails lengthwise.
Brush butter sauce on flesh side of lobster tails.
Put on grill, and turn after 6 minutes, being sure to add butter sauce carefully after they are turned. Cooking time will vary, but should take about 15 minutes. Lobster when cooked is always an opaque color.

Please note: you cannot use the extra marinade/butter sauce on the lobster once it is cooked. If you would like to have extra sauce, keep some on the side to serve in a separate bowl.

read more "Try #Finlandia Butter in these recipes!"

Enter the Jarlsberg® Cheese Extraordinary Grill Contest! (Recipes included!)


What better way to enjoy the summer grill season than to win a free, professional grill, in the Jarlsberg® Cheese Extraordinary Grill Contest? Every week, Jarlsberg® Cheese will give away a professional grill to one winner. Entering is easy. Starting May 23rd, simply enter to win by filling out the Jarlsberg® Cheese Extraordinary Grilling Contest form on their Facebook page or Jarlsberg website. You may enter one time every week, through August 31, 2015. Each week one winner will be randomly selected, and be notified by email.

And to entice you to try Jarlsberg® Cheese, I have some delicious recipes for you!


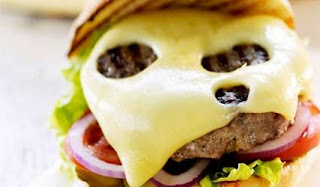
The Jarlsberger

The Jarlsberger

Yield: 4 hamburgers
Ingredients
  • 4 slices Jarlsberg sliced Lite or Hickory Smoked Cheese
  • 1 pound ground meat
  • 4 hamburger buns
  • 8 slices of pickle (or to liking)
  • 2 egg whites
  • Mayonnaise, ketchup, or mustard to liking
  • Large lettuce leaves, torn to fit bun
  • Salt and pepper
Directions
  1. Gently mix meat with egg whites, salt and pepper, and form 4 patties.
  2. Grill the burgers for about 4 – 5 minutes on each side.
  3. During the final minutes of  cooking, place a slice of Jarlsberg® Cheese on the burgers, until melted.
  4. Heat the buns on the grill, slightly, then spread mayonnaise, mustard, and/or ketchup on the buns. Add lettuce leaves, tomato slices, red onions and pickles.
  5. Serve and enjoy.

Jarlsberg Grilled Fig Pizza


Jarlsberg Grilled Fig Pizza

Ingredients
  • 2 cups Shredded Jarlsberg Cheese
  • 1 pound of dough pound of dough (buy at your local pizzeria)
  • 1 can crushed tomatoes
  • Olive oil spray
  • Toppings as desired
  • Figs – fresh and as many as you desire
  • Salt, pepper and basil to taste
Cooking Directions
  1. Before you light the grill, spray olive oil over grill, being sure to cover well. Once grill is hot, gently lay the dough, stretched out already, on the grill.
  2. Cook for 3 minutes or until crust starts to brown slightly, then flip.
  3. In a separate bowl, mix crushed tomatoes, adding in salt, pepper, and fresh basil to taste.
  4. Lay tomato mixture and Jarlsberg Cheese on top of crush, and scatter some fresh, sliced figs.
  5. Cover for 4-5 minutes, until cheese is melted.
  6. Use a large spatula to remove pizza from grill.


The Jarlsberger looks amazing! I may have to try that this summer!
read more "Enter the Jarlsberg® Cheese Extraordinary Grill Contest! (Recipes included!)"

3 Must-Try Easter recipes using #Jarlsberg Cheese!


Easter is upon us again, and if you're looking for something new to make on Sunday, we have 3 great recipes for you to try and their made with our favorite - Jarlsberg® Cheese! (Does that pizza look so good?)


Egg, Ham and Jarlsberg® Cheese Cups

Ingredients
  • 4 slices Black Forest or Virginia ham
  • 4 large eggs
  • 4 slices Jarlsberg® Cheese
  • Salt & pepper (to taste)
  • Fresh basil, scallions or parsley, optional
Directions
  1. Preheat oven to 400 degrees F.
  2. Lightly coat 4 muffin cups with nonstick cooking spray.
  3. Fit 1 slice of ham into each muffin cup. (Ham will hang over edges of cups.)
  4. Crack 1 egg into each cup.
  5. Bake in middle of oven until egg whites are cooked but yolks are still runny, which is about 13 minutes. (Add Jarlsberg® Cheese slices 5 minutes before done.)
  6. Season eggs with salt & pepper and remove cups carefully.
  7. Sprinkle with chopped basil, scallions, or parsley.


Jarlsberg® Cheese & Asparagus Tart

Ingredients
  • 2 cups Jarlsberg Lite Cheese, shredded
  • 1 sheet frozen puff pastry, thawed
  • 1 lb. asparagus
  • 1 tbsp. olive oil
  • 1 tbsp. fresh thyme leaves
  • Salt & pepper (to taste)
Directions
  1. Preheat oven to 400 degrees. Prepare a baking sheet with parchment paper.
  2. Roll out the puff pastry into a 16-by-10 inch rectangle, trimming uneven edges. Place on baking sheet. With a knife, lightly score the pastry dough 1-inch from the edges to mark a rectangle. Using a fork, pierce dough inside the markings at ½-inch intervals. Bake until golden, about 15 minutes.
  3. Remove the pastry shell from the oven, and sprinkle with the shredded Jarlsberg® Cheese. Trim the bottoms of the asparagus spears to fit crosswise inside the pastry shell – arrange in a single layer over the Jarlsberg® Cheese, alternating ends and tips. Brush with oil, sprinkle thyme leaves, and season with salt and pepper. Bake until spears are tender, about 20 minutes.


Jarlsberg® Breakfast Pizza

Ingredients
  • Store-bought flatbread or pizza dough
  • 1 1/2 cups Jarlsberg® cheese, shredded
  • 4 eggs
  • 4 slices bacon
  • 4-6 cherry tomatoes, sliced in half
  • 1 tbsp. chopped basil, plus one sprig as garnish
  • Freshly ground pepper, salt
Directions
  1. Preheat oven to 500 degrees. Line a baking sheet with parchment paper.
  2. Roll out the pizza dough to desired thickness.
  3. Place the rolled out pizza dough on to the prepared baking sheet. Top with shredded cheese. Make 4 small wells with the cheese, and crack an egg into each well. Arrange the bacon around the eggs, and top with the chopped basil leaves and the tomato halves. Season with salt and pepper.
  4. Bake for about 8-10 minutes until the eggs are just set and the pizza crust is golden.

Which one are you likely to try? I really want to try the asparagus tart!
read more "3 Must-Try Easter recipes using #Jarlsberg Cheese!"

Spinach & Avocado Turkey Sandwich with #HillshireNaturals {Recipe}


#spon: I'm required to disclose a relationship between our site and Hillshire. This could include Hillshire providing us w/content, product, access or other forms of payment.


This year, I vowed I would start eating healthier, and so far, I've done okay. The only problem is that I like sandwiches, especially if they involve cheese and and turkey lunch meat. But general turkey lunch meat has so much sodium and other stuff that really isn't good for me.

Thanks to Hillshire Farms Naturals, I can now have sandwiches and have my turkey lunch meat, too! Hillshire Farm Naturals™ lunchmeats are crafted to be both 100% natural and 100% delicious. The lunchmeats are slow roasted in their own juices and have no artificial ingredients or preservatives. Also, there are no added nitrates or nitrites, which makes it healthier for those who can't live without their lunchmeat.


Like I said, I prefer turkey lunch meat, since I've never really been a ham fan so I decided to try Hillshire Farms Naturals Slow Roasted Turkey Breast and Hillshire Farms Naturals Hardwood Smoked Turkey Breast. How did they taste?

When you eat regular lunchmeat, a lot of it tastes really salty. That's not the case with Hillshire Farms Naturals! I could barely taste the salt (if there was any), which is always a plus in my book. How was the turkey? Delicious! It actually tasted like turkey, and reminded me of the leftover Thanksgiving turkey sandwiches we would always have. The meat itself didn't taste artificial at all, and had a healthy mouth feel to it. I'm not sure if I can go back to regular lunchmeat anymore!

(Be sure to follow Hillshire Farms on Facebook and Twitter for more deliciousness!)

Since it's been a while since we've done a food recipe (Drink recipes don't count!), I thought I would use the Hillshire Farms Naturals Slow Roasted Turkey Breast in a sandwich recipe!


Spinach & Avocado Turkey Sandwich

Prep time: 5-10 mins.
Total time: 5-10 mins.

Ingredients
  • 2 slice rye bread (or whole wheat, depending on what you prefer)
  • 2 slices Hillshire Farms Naturals Slow Roasted Turkey Breast
  • 1/2 Avocado
  • 1/2 handful Spinach leaves (We used the bagged spinach but you can use fresh spinach.)
  • Sliced red onion to taste
  • lemon juice
Directions
  1. Remove avocado flesh from avocado half. Spread on one side on each slice of rye bread.
  2. Place spinach on top of avocado.
  3. Slice a little bit of red onion (to taste) and place on top of spinach.
  4. Take 2 slices of Hillshire Farms Naturals Slow Roasted Turkey Breast and put it on top of onion.
  5. Drizzle with a little bit of lemon juice.
  6. Close sandwich with remaining slice of bread, avocado facing down.
  7. Enjoy!
What's your favorite way to make a wonderfully delicious turkey sandwich?
read more "Spinach & Avocado Turkey Sandwich with #HillshireNaturals {Recipe}"

Get the natural taste of #ReedsGinger Brews! {+ Cocktail Recipe}

Somehow, I grew up loving ginger ale. Even ask a kid, I loved the taste of a good ol' ginger ale. But nowadays, a lot of ginger ale sodas are all sugar and no ginger!

Reed's Ginger Brews' passion for ginger allowed them to revive a unique ginger brewing process that predates modern soft drink technology. They brew using the finest fresh ginger root, fruit juices, spices, and herbs. Their ginger brews are made with natural ingredients to ensure a natural taste. Their Ginger Brews come in 6 delicious flavors including Original Ginger Brew, Extra Ginger Brew, Premium Ginger Brew, Raspberry Ginger Brew, Cherry Ginger Brew, and Spiced Apple Ginger Brew.

Since ginger is the name of their game, Reed's also offers ginger chews, nausea relief, energy elixir, crystallized ginger, and ice cream! (For those not a fan of ginger brews, they have Virgil's Root Bear, Sonoma Sparkler, Culture Club Kombucha, Flying Cauldron Butterscotch Beer, and China Cola available).

I don't know about you, but ginger ice cream sounds intriguing and delicious!

Be sure to follow Reed's on Facebook, Twitter, Instagram, and YouTube!

BUY
You can buy Reed's Ginger Brews through their shop or use their store locator for a retailer near you.

WHAT I THOUGHT (And cocktail recipe!)
like I said, I am a big ginger ale fan. I rarely drink sodas like Dr Pepper and when I do, I can't drink the whole thing. So when I am really craving that soda taste, I reach for a ginger ale. But who wants to drink a bunch of sugar a little teeny bit of ginger? So you better believe I was ready to see if Reed's Ginger Brews were up the challenge. Verdict? They surpass any other ginger soda I've had!

Why? You can actually taste the ginger. The Extra Ginger Brew was my favorite. The extra ginger made for a unique soda experience. And not to mention that ginger sodas are a lot better for your upset tummy than the lemon/lime sodas. I even drank the Spiced Apple Ginger Brew the next day before I wanted to try it so badly. It tastes A LOT better cold. Either way, I think I love Reed's Ginger Brew! It has replaced my former brand of ginger sodas.

Okay, everyone ready for the cocktail recipe? I know you are!

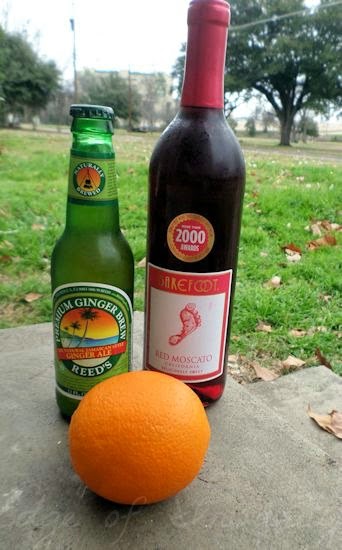
I know the orange is HUGE! That was all my local grocery store had.


Red Wine & Ginger Brew Fizz

Ingredients:
  • 4 orange slices or segments
  • 5/8 cup chilled light red wine (I used Barefoot Moscato at 9%)
  • 1/2 cup chilled Reed's Ginger Brew
  • 1 large tumbler
  • Optional: Ice
How to make it:
  1. Place 4 orange slices or segments into the bottom of a large tumbler glass.
  2. Pour in 5/8 cup of chilled light red wine.
  3. Pour in 1/2 cup of chilled Reed's Ginger Brew. Do not stir.
  4. Ice is optional, but you can put the ice in after you pour in the ginger brew.
This bad boy was tasty and loved the fizzied orange pieces!

NOTES: I couldn't find the tumblers so I had to use a champagne flute. I accidentally added a little more wine that I should have, so don't be surprised if your version comes out lighter. It's supposed to be light! You can also add as much wine or ginger brew as you need to, depending on taste.
read more "Get the natural taste of #ReedsGinger Brews! {+ Cocktail Recipe}"

Give Your Thanksgiving Side Dishes a Makeover with #Frenchs! (Recipes)

In my opinion, it is NEVER too early to start thinking about Thanksgiving. If you're anything like my family, we want to make some different dishes this year, and French's has you covered! You can make new and exciting dishes using French's Fried Onions! But did you know that the tradition of serving French's Fried Onions began with the Green Bean Casserole and about 40 million people will once again dip a spoon in to this delicious dish?


Crunchy Onion Bacon Potatoes

Prep time: 10 mins
Cook time: 25 mins
Ingredients
  • 6 cups prepared mashed potatoes
  • 12 slices bacon, cooked and crumbled
  • 2 cups shredded cheddar cheese
Cooking Directions
  1. PREHEAT oven to 350*F. Layer half of the potatoes in an 8-inch square baking dish; sprinkle with half the bacon, 1 cup of cheese, and 1 cup of French's Fried Onions. Top with remaining potatoes.
  2. BAKE 20 minutes or until hot. Top with remaining bacon, cheese, and French's Fried Onions. Bake 5 minutes or until cheese is melted.


Crunchy Holiday Stuffing

Prep time: 10 mins
Cook time: 20 mins
Ingredients
  •  1/2 cup (1 stick) butter or margarine
  •  1 1/2 cups coarsely chopped celery
  •  1 1/2 cups coarsely chopped carrots
  • 1 pkg. (14 oz) stuffing (but I prefer cornbread)
  • 2 cups French's Fried Onions
  • 1 can (14.5 oz) chicken broth
  • 1 cup water
Cooking Directions
  1. PREHEAT oven to 360*F. Melt butter or margarine in a large pot, stir in vegetables, and saute for 5 minutes.
  2. ADD stuffing, broth, and water, and stir until moistened. Gently stir in French's Fried Onions. Spoon stuffing into a 3-quarter baking dish.
  3. COVER and bake for 10 minutes. Uncover, sprinkle on remaining 1 cup of French's Fried Onions. Bake, uncovered, for 5 minutes or until onions are golden.


French's Green Bean Casserole (Classic)

Prep time: 5 mins
Cook time: 35 mins
Ingredients
  • 1 (10 3/4 oz.) can Campbell's Cream of Mushroom soup
  • 3/4 cup milk
  • 1/8 tsp. black pepper
  • 4 cups cut green beans, cooked
  • 1 1/3 cups French's Fried Onions (Original or Cheddar)
Cooking Directions
  1. MIX soup, milk, and pepper in a 1 1/2-quart baking dish. Stir in cooked cut green beans and 2/3 cup of French's Fried Onions.
  2. BAKE at 350*F for 30 minutes, or until hot.
  3. STIR and top with remaining 2/3 cup of French's Fried Onions. Bake for 5 minutes or until fried onions are golden.

What is YOUR favorite Thanksgiving dish?


read more "Give Your Thanksgiving Side Dishes a Makeover with #Frenchs! (Recipes)"

#JDCrumbles Cornbread Breakfast Casserole (Recipe)

#spon: I'm required to disclose a relationship between our site and Jimmy Dean. This could include Jimmy Dean providing us w/content, product, access or other forms of payment.

Jimmy Dean logo  
When it comes to breakfast, nothing beats a one-meal casserole. It includes everything you would need: bread, meat, veggies, and cheese (not that you would need cheese for breakfast). I usually have a bowl of cereal for breakfast, but the other morning, I was craving something a little more substantial. I remembered I had some Jimmy Dean Pork Sausage Crumbles in the freezer and a cornbread breakfast recipe floating around somewhere and thought those two would make a perfect pair!

Oh wait- you haven't heard of Jimmy Dean Crumbles? Essentially, Jimmy Dean Crumbles are sausage bits that are chopped up so you don't have to chop the sausage yourself and you can add it to pretty much any dish you want for a zing of flavor! Flavors available include the pictures Pork Sausage, Turkey, and Hot & Spicy.
Jimmy Dean Original Pork Sausage Crumbles
A few weeks ago, I was challenged to make a delicious dish using Jimmy Dean Crumbles, and I was up for the challenge. I decided to modify this yummy-looking Jiffy Mix Cornbread Casserole from A Fridge Full of Food. Since we don't use Jiffy Mix, onions, or hash browns, I thought I could mix it up a little bit and create my very own Jimmy Dean Crumbles Cornbread Breakfast Casserole. Enjoy!

Cornbread Breakfast Casserole using Jimmy Dean Crumbles

Jimmy Dean Cornbread Breakfast Casserole

Ingredients
  • 2 16oz sweet cornbread mix
  • 1/2 bag Jimmy Dean Pork Sausage Crumbles
  • 1 red bell pepper, chopped
  • 1/2 green bell pepper, chopped
  • 1/4 cup onion flakes (or 1 medium onion, chopped)
  • 1 1/2 cup shredded mild cheddar cheese
Cooking Directions
  1. Preheat your oven to 400*. Grease or oil an 11x11 baking pan. (We used a brownie pan.)
  2. Prepare cornbread mix according to directions. If you want the cornbread to be extra moist, add another 1/4 cup of milk.
  3. Add 1/2 bag of Jimmy Dean Pork Sausage Crumbles, chopped veggies, and shredded mild cheddar cheese to cornbread mixture. Stir thoroughly.
  4. Bake at 400* until toothpick comes out clean and cheese is melted.
This would make a great breakfast for special holidays or when you're in the mood for something fun and delicious! We still have some Jimmy Dean Crumbles in the freezer so now I have to come up with more fun recipes to use them in. Any ideas?

read more "#JDCrumbles Cornbread Breakfast Casserole (Recipe)"